从零开始自制操作系统01 系统启动过程 按下启动键,主板发送信号给电源,而电源收到信号后会给电脑供应合适的电量。一旦主板收到了电源备妥信号,它会尝试启动CPU。CPU加电,复位引脚被置位,CPU内的寄存器状态也被重置。
通过查阅手册可以得知。(查看Intel手册第三卷第9章可以发现,CPU内其他相关寄存器被置位的详细情况)
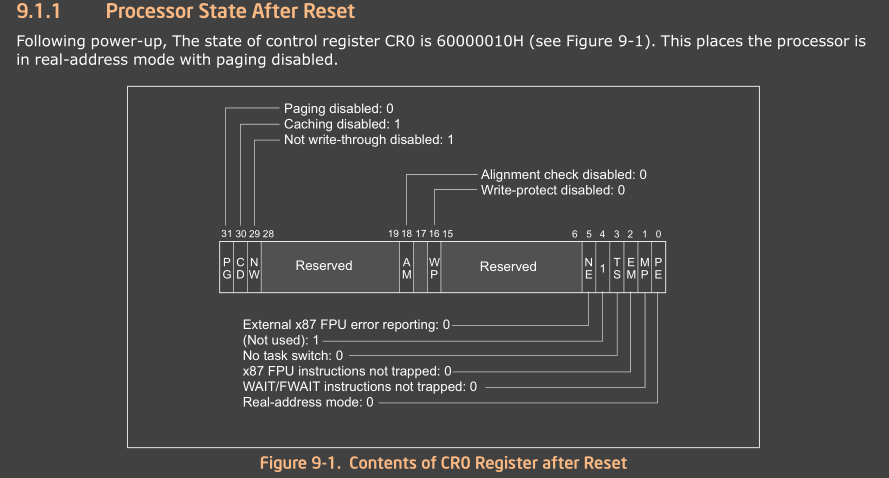
IP 0xfff0 CS selector 0xf000 CS base 0xffff0000 CR0 60000010H
根据CR0值可知,CPU处于实模式。进而推出此时CPU的寻址方式是分段方式。
1 PhysicalAddress = 基地址(Base address ) + 偏移(Offset )
结合寄存器CS和IP的值可以推导出。CPU即将执行的第一条指令,位于物理地址0xffff0000 + 0xfff0=’0xfffffff0’处。
BIOS引导 假设BIOS根据启动项,选择了软盘启动。BIOS程序会去检查软盘是否有引导闪区。如果软盘存在引导扇区就把扇区的数据复制到内存地址0x7c00处,跳转到0x7c00处执行。意味着CPU离开BIOS程序开始执行Bootloader。
引导闪区定义(软盘):软盘的第0磁头,第0磁道,第一个扇区十分以0x550xaa结尾。
参考 1 2 3 4 一个64 位操作系统的设计与实现//gi thub.com/MintCN/ linux-insides-zh
实验 自己制作一个简单“引导”程序放在,软盘(虚拟)的引导扇区,用Boches虚拟机执行。(附加:在根据清华大学os课程,用qemu复现)
实验环境描述
1 Linux qemugdb 5 .11 .0 -41 -generic #45 ~20 .04 .1 -Ubuntu SMP Wed Nov 10 10 :20 :10 UTC 2021 x86 _64 x86 _64 x86 _64 GNU/Linux
编译Boches 1 2 3 4 5 6 7 8 9 10 11 12 13 14 15 16 17 18 19 20 21 22 23 24 25 sudo apt-get install build-essential0 -dev\ 6 \ \ 64 \ \ \ debugger \ \ debugger -gui \ \ \ 3dnow \ \ \ debugger \ \ \ \ with -x --with -x11 --with -term
启动环境配置脚本 什么是启动环境配置脚本?
1 2 3 4 5 6 7 8 9 10 11 12 13 14 15 16 17 18 19 20 21 22 23 24 25 26 27 28 29 30 31 32 33 34 35 36 37 38 39 40 41 42 43 44 45 46 47 48 49 50 unmapped =1, biosdev =1, speaker =1, extfpuirq =1, parallel =1, serial =1, iodebug =1file ="/usr/local/share/bochs/BIOS-bochs-latest" file ="/usr/local/share/bochs/VGABIOS-lgpl-latest" disabled =0type =1_44, 1_44 ="boot.img" , status =inserted, write_protected =0enabled =1, ioaddr1 =0x1f0, ioaddr2 =0x3f0, irq =14type =nonetype =noneenabled =1, ioaddr1 =0x170, ioaddr2 =0x370, irq =15type =nonetype =noneenabled =0enabled =0enabled =1, chipset =i440fxextension =vbe, update_freq =5count =1:1:1, ips =4000000, quantum =16, model =corei7_sandy_bridge_2600k, reset_on_triple_fault =1, cpuid_limit_winnt =0, ignore_bad_msrs =1, mwait_is_nop =0, msrs ="msrs.def" enabled =0enabled =0enabled =0enabled =0sync =none, time0 =local, rtc_sync =0action =ignoreaction =reportaction =reportaction =asktype =mf, serial_delay =250, paste_delay =100000, user_shortcut =nonetype =ps2, enabled =0, toggle =ctrl+mbuttonenabled =1, mode =systemenabled =1, file =noneenabled =0enabled =1, mode =null enabled =0enabled =0enabled =0
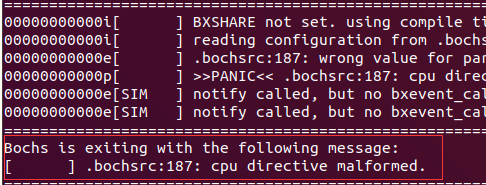
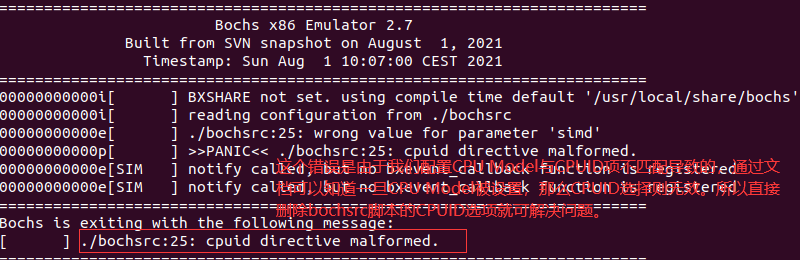
在用脚本启动boches虚拟机的过程中遭遇如下错误。
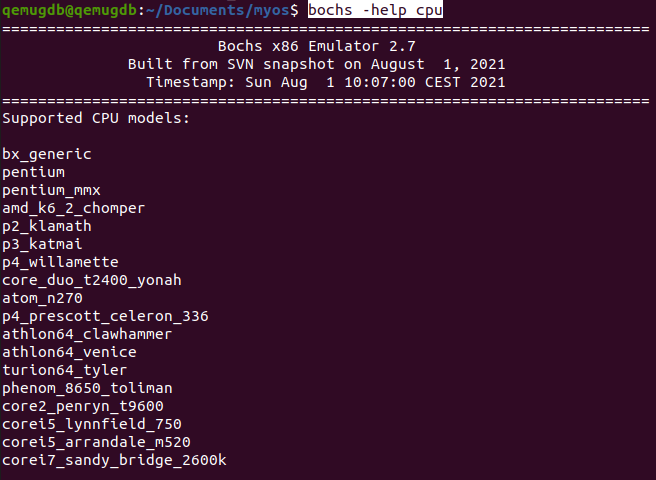
查阅Bochs教程 后了解到是CPU Model设置错误。通过命令”bochs -help cpu”可以活得当前虚拟机所支持的CPU型号。由于我要编写的基于x86架构的64位操作系统,因此我选择corei7_sandy_bridge_2600k作为CPU model。于此同时根据Bochs教程 一旦CPU Model被设定,那么CPUID选项则不在有效,因此可以不写CPUID的配置项。
制作引导程序 引导程序源码,采用NASM编译。编译命令如下。
1 nasm boot.asm -o boot.bin
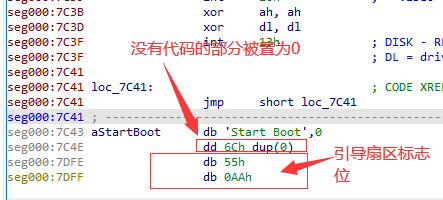
org 0x7c00,告诉编译器代码块起始地址0x7c00,因此访问全局变量时,应该以0x7c00位基地址计算偏移量。$编译器会解释为当前地址,$$编译器会解释为代码块首地址。times n db 0,告诉编译器从当前位置开始向后填充n词0字节。综上所述”times 510 - ($ - $$) db 0”,的意思就是将引导扇区前510个字节,没有被代码占用的字节设置位0。
1 2 3 4 5 6 7 8 9 10 11 12 13 14 15 16 17 18 19 20 21 22 23 24 25 26 27 28 29 30 31 32 33 34 35 36 37 38 39 40 41 42 43 44 45 46 47 48 49 50 51 52 53 54 org 0x7c00 equ 0x7c00 Label_Start: mov ax , cs mov ds , ax mov es , ax mov ss , ax mov sp , BaseOfStackmov ax , 0600h mov bx , 0700h mov cx , 0 mov dx , 0184fh int 10h mov ax , 0200h mov bx , 0000h mov dx , 0000h int 10h mov ax , 1301h mov bx , 000fh mov dx , 0000h mov cx , 10 push ax mov ax , ds mov es , ax pop ax mov bp , StartBootMessageint 10h xor ah , ah xor dl , dl int 13h jmp $ StartBootMessage: db "Start Boot" times 510 - ($ - $$) db 0 dw 0xaa55
制作软盘镜像 前面已经编译了大小为512字节的引导程序。现在需要将512字节的引导程序写入,虚拟软盘的第一个扇区。这样虚拟机就会将软盘识别为启动盘。
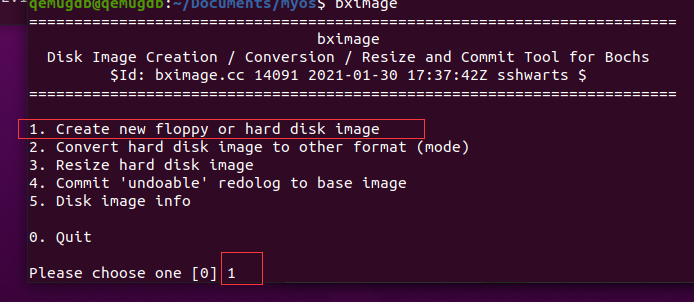
第一步 用bochs虚拟机提供的小工具bximage’’制作软盘镜像,输入1,选择创建软盘或硬盘镜像。
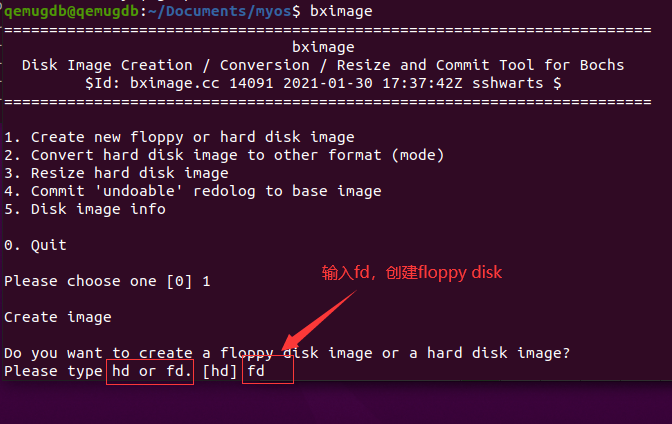
输入fd,创建软盘。
创建大小1.44M软盘镜像,并且设置镜像名。
第二部 到此软盘镜像已经创建完毕,应该向软盘镜像写入引导程序了。
1 dd if =boot.bin of=boot.img bs=512 count=1 conv=notrunc
if 表示从文件获取输入(而不是从stdin),这里即为编译后的二进制机器码文件boot.bin
of 表示输出到文件(而不是输出到stdout),这里指的是a.img
bs 一个操作块的大小,默认512。(dd读写操作以块为单位)
一共操作几次。(这里只用操作一次)
conv=notrunc,表示不截断文件。
如何理解截断 如果输入文件1块,输出文件有12块。执行”dd if=boot.bin of=boot.img bs=512 count=1”命令后,输出文件大小只有个1个块。剩余的11块被截断掉了。
并且如果块大小为512字节,而输入文件只有510字节。执行”dd if=boot.bin of=boot.img bs=512 count=1”命令后。输出块依然有510字节,不够的两个字节,并未被补齐。
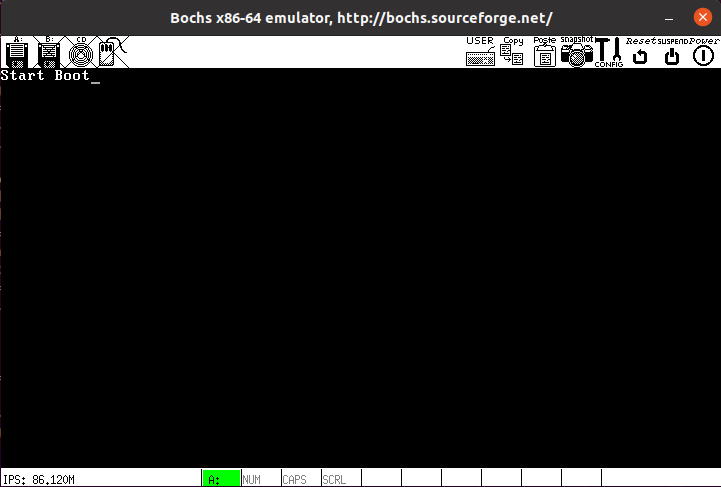
启动动虚拟机 启动命令
用qemu执行引导程序 Reference https://blog.csdn.net/qq_37637619/article/details/89866689 Bochs教程 解决bochs启动脚本CPU model报错